
We make netTerrain — an IT documentation & visualization platform for data centers(DCIM), networks(Logical), and fiber plants(OSP) — easy to integrate with third-party databases via pre-built connectors and highly extensible, well-documented APIs. We get a lot of questions from customers that appreciate our swagger REST API documentation but still struggle a bit to get started.
This blog post /exercise guide series is divided into three mini blogs — this series can be useful for all those software developers out there that can’t wait to create integrations with netTerrain but need that extra gear to get things in motion. It’s also dedicated to those netTerrain power users that want to add their special foo and are too anxious to wait for that pet feature in the roadmap.
In this first blog post, we will go over setting up the API and authenticating.
Users of the API are typically programmers familiar with C# (or Java or Python or whatever you get your hands on that works in our framework). If you are not familiar with any of these vastly superior OO languages and all you did was write some spaghetti PHP scripts or hack some SQL— you are still welcome, we forgive you. Plenty of examples are provided throughout this series to help you along the way.
At Graphical Networks, we provide our users with full guides to our API (as well as classes and trainings) if you want to become an expert and feel like you could use a guiding hand.
Now go turn those cups of coffee into lines of code!
1.1 Assumptions
We assume you have a good understanding of the following concepts:
- netTerrain (that thing that Graphical Networks makes)
- The difference between an instance and a type (in netTerrain terms). Ok, in netTerrain a type is defined in the catalog (chair), and an instance is a manifestation of that type in the project (the second chair on the left, in the blue conference room). It is akin to class vs instantiation of that class in OO programming. Now you know.
- Node and link properties and their values
- Object oriented programming languages (using C# for example)
1.2 Setting up the API
Before using the RESTful API we have to make sure it is turned on. It is turned on by default, but it’s good to know how to switch it on or off for your netTerrain instance.
Complete the API set-up procedure by following these steps:
a) After logging into netTerrain follow these steps:
i. Make sure you are logged into netTerrain with admin permissions.
ii. Go to the Admin Console page.
iii. Find the ‘API settings’ group and make sure the ‘Enable RESTful API’ checkbox is checked.
b) For testing the API with Swagger:
i. On the netTerrain page open the Help menu and click on ‘REST Guide’.
ii. On the Swagger page find the ‘Vendors’ section.
iii. In the expanded Vendors group, click on ‘GET /wapi/v1/vendors’.
iv. In the expanded method description find and click the ‘Try it out!’ button.
v. Submit an appeared Basic authentication form with your credentials.
vi. Check out the response under the ‘Try it out’ button. Make sure the response code is 200.
1.3 Discovering Postman
The RESTful API’s Swagger guide contains all API methods with descriptions and even lets you try them. However, not all API features are represented there. We usually recommend using the Postman RESTful API client application for testing API methods.
Follow these steps to run a successful API request from Postman:
a) Go to https://www.getpostman.com/ and follow the instructions.
b) Open Postman:
a. Insert “http://localhost:50001/wapi/v1/vendors” to the URL field (from here on use your own URL prefix if it is different).
b. Make sure the request type is GET.
c. Click “Send”.
c) Check out the response:
a. It should return an “401 Unauthorized” with “Invalid username or password” error message.
b. In case of a different response, check your API settings and the URL.
d) Add Basic authentication:
a. Go to the Authorization tab and select “Type” > “Basic Auth”.
b. Type your username and password.
c. Click “Send”.
If everything went peachy you should see a “200 Ok” response with a list of vendors in a response dialog.
1.4 Setting up bearer authentication
Authentication of a request is one of the RESTful API basic aspects. In the previous exercise, we used Basic authentication as the fastest and simplest way to be authorized in the application. However, it is also an unsafe way of accessing the API:
- Basic authentication requires sending unencrypted user credentials in each request. They’re just encoded to a Base64 string that gives them no protection and one must rely on SSL only in order to protect a username and password from being compromised.
- Basic authentication is vulnerable to Cross-Site Request Forgery (CSRF) attacks (when you log into netTerrain a browser creates an authentication cookie that an attacker may use to execute malicious requests to your application’s API from a fake page).
Thus, two rules should be followed when working with the API:
- Use SSL.
- Don’t change any data with Basic authentication, only use it for GET requests.
A better alternative when it comes to security is to use another type of authentication called Bearer: an API client requests an encrypted access token providing some credentials once and then adds the received token to all subsequent requests to the API. All requests bearing this token will be authorized until the token expires.
Let’s set up some API authentication the right way:
a) For checking the state of anti-forgery protection:
i. Find your application ‘web.config’ file in your local netTerrain instance.
ii. Open the file with a text editor and search for the ‘ValidateAntiForgeryToken’ attribute.
iii. Edit it as follows:
<!-- Validate anti-forgery token for POST, PUT and DELETE http requests. --><add key="ValidateAntiForgeryToken" value="true">
iv. Save and close the file.
b) For running a GET request with basic authentication
i. In Postman, insert: “http://localhost:50001/wapi/v1/vendors” into the URL field.
ii. Go to the Authorization tab and select “Type” > “Basic Auth”.
iii. Type your username and password in the form.
iv. Click “Send”.
v. Check if the result is “200 Ok”.
c) For running a POST request with basic authentication
i. Leave the Postman’s URL field as is (http://localhost:50001/wapi/v1/vendors) — but change the rest of the settings as shown below:
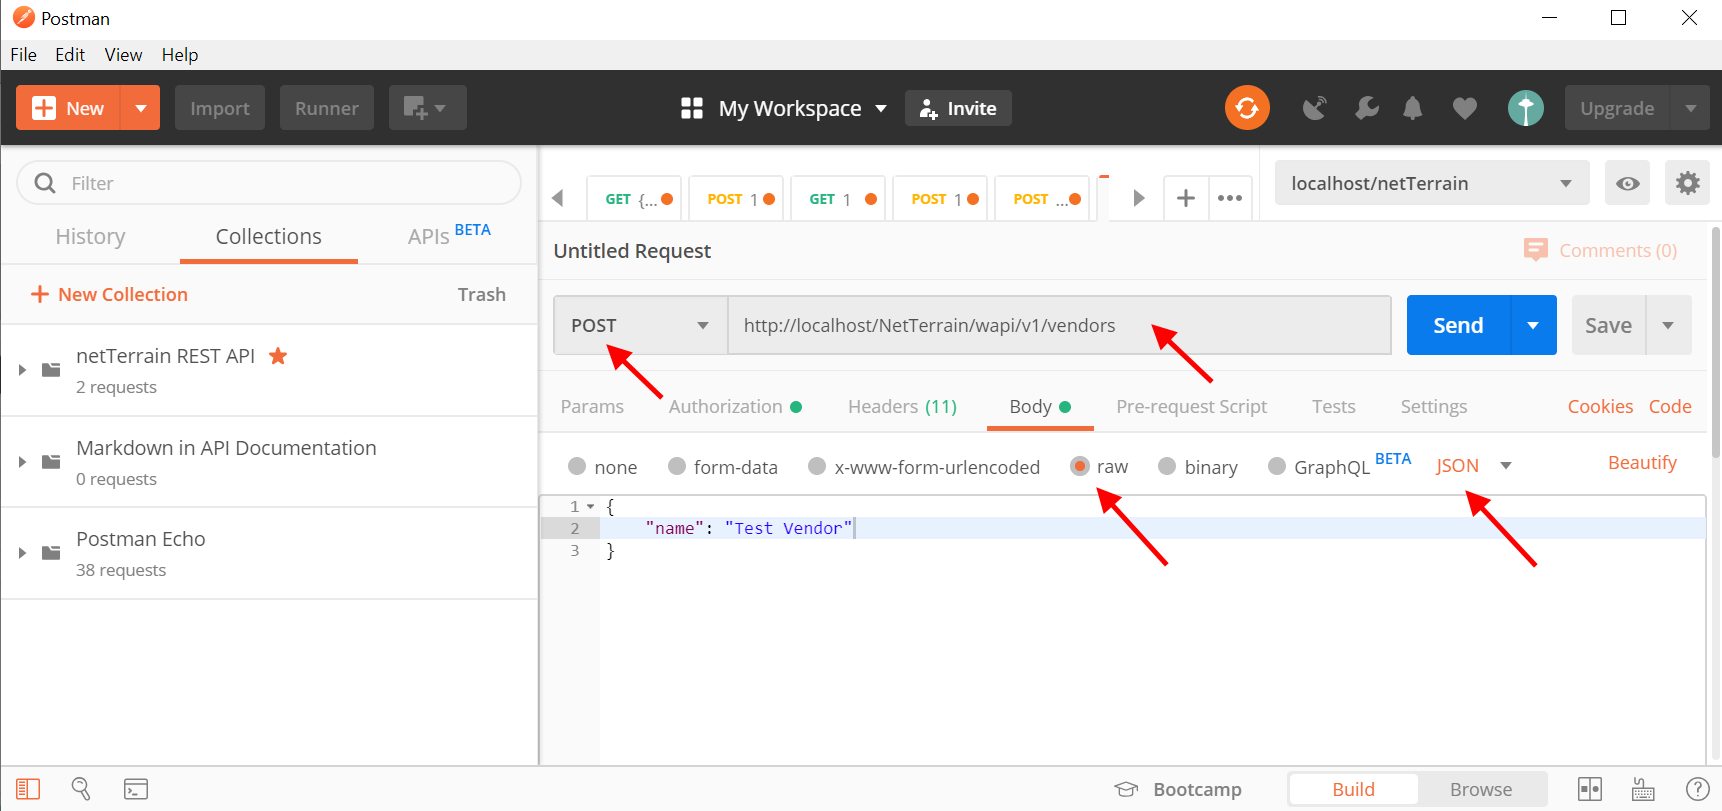
ii. Go to the Authorization tab and select “Type” > “Basic Auth”.
iii. Type your username and password in the form.
iv. Click “Send”.
v. Check out the response – it should say “401 – Unauthorized. A Post request with Basic authentication has been declined.”
d) For requesting a Bearer token:
i. Send a POST request to the URL “http://localhost:50001/wapi/v1/token”
filling the request body as shown:
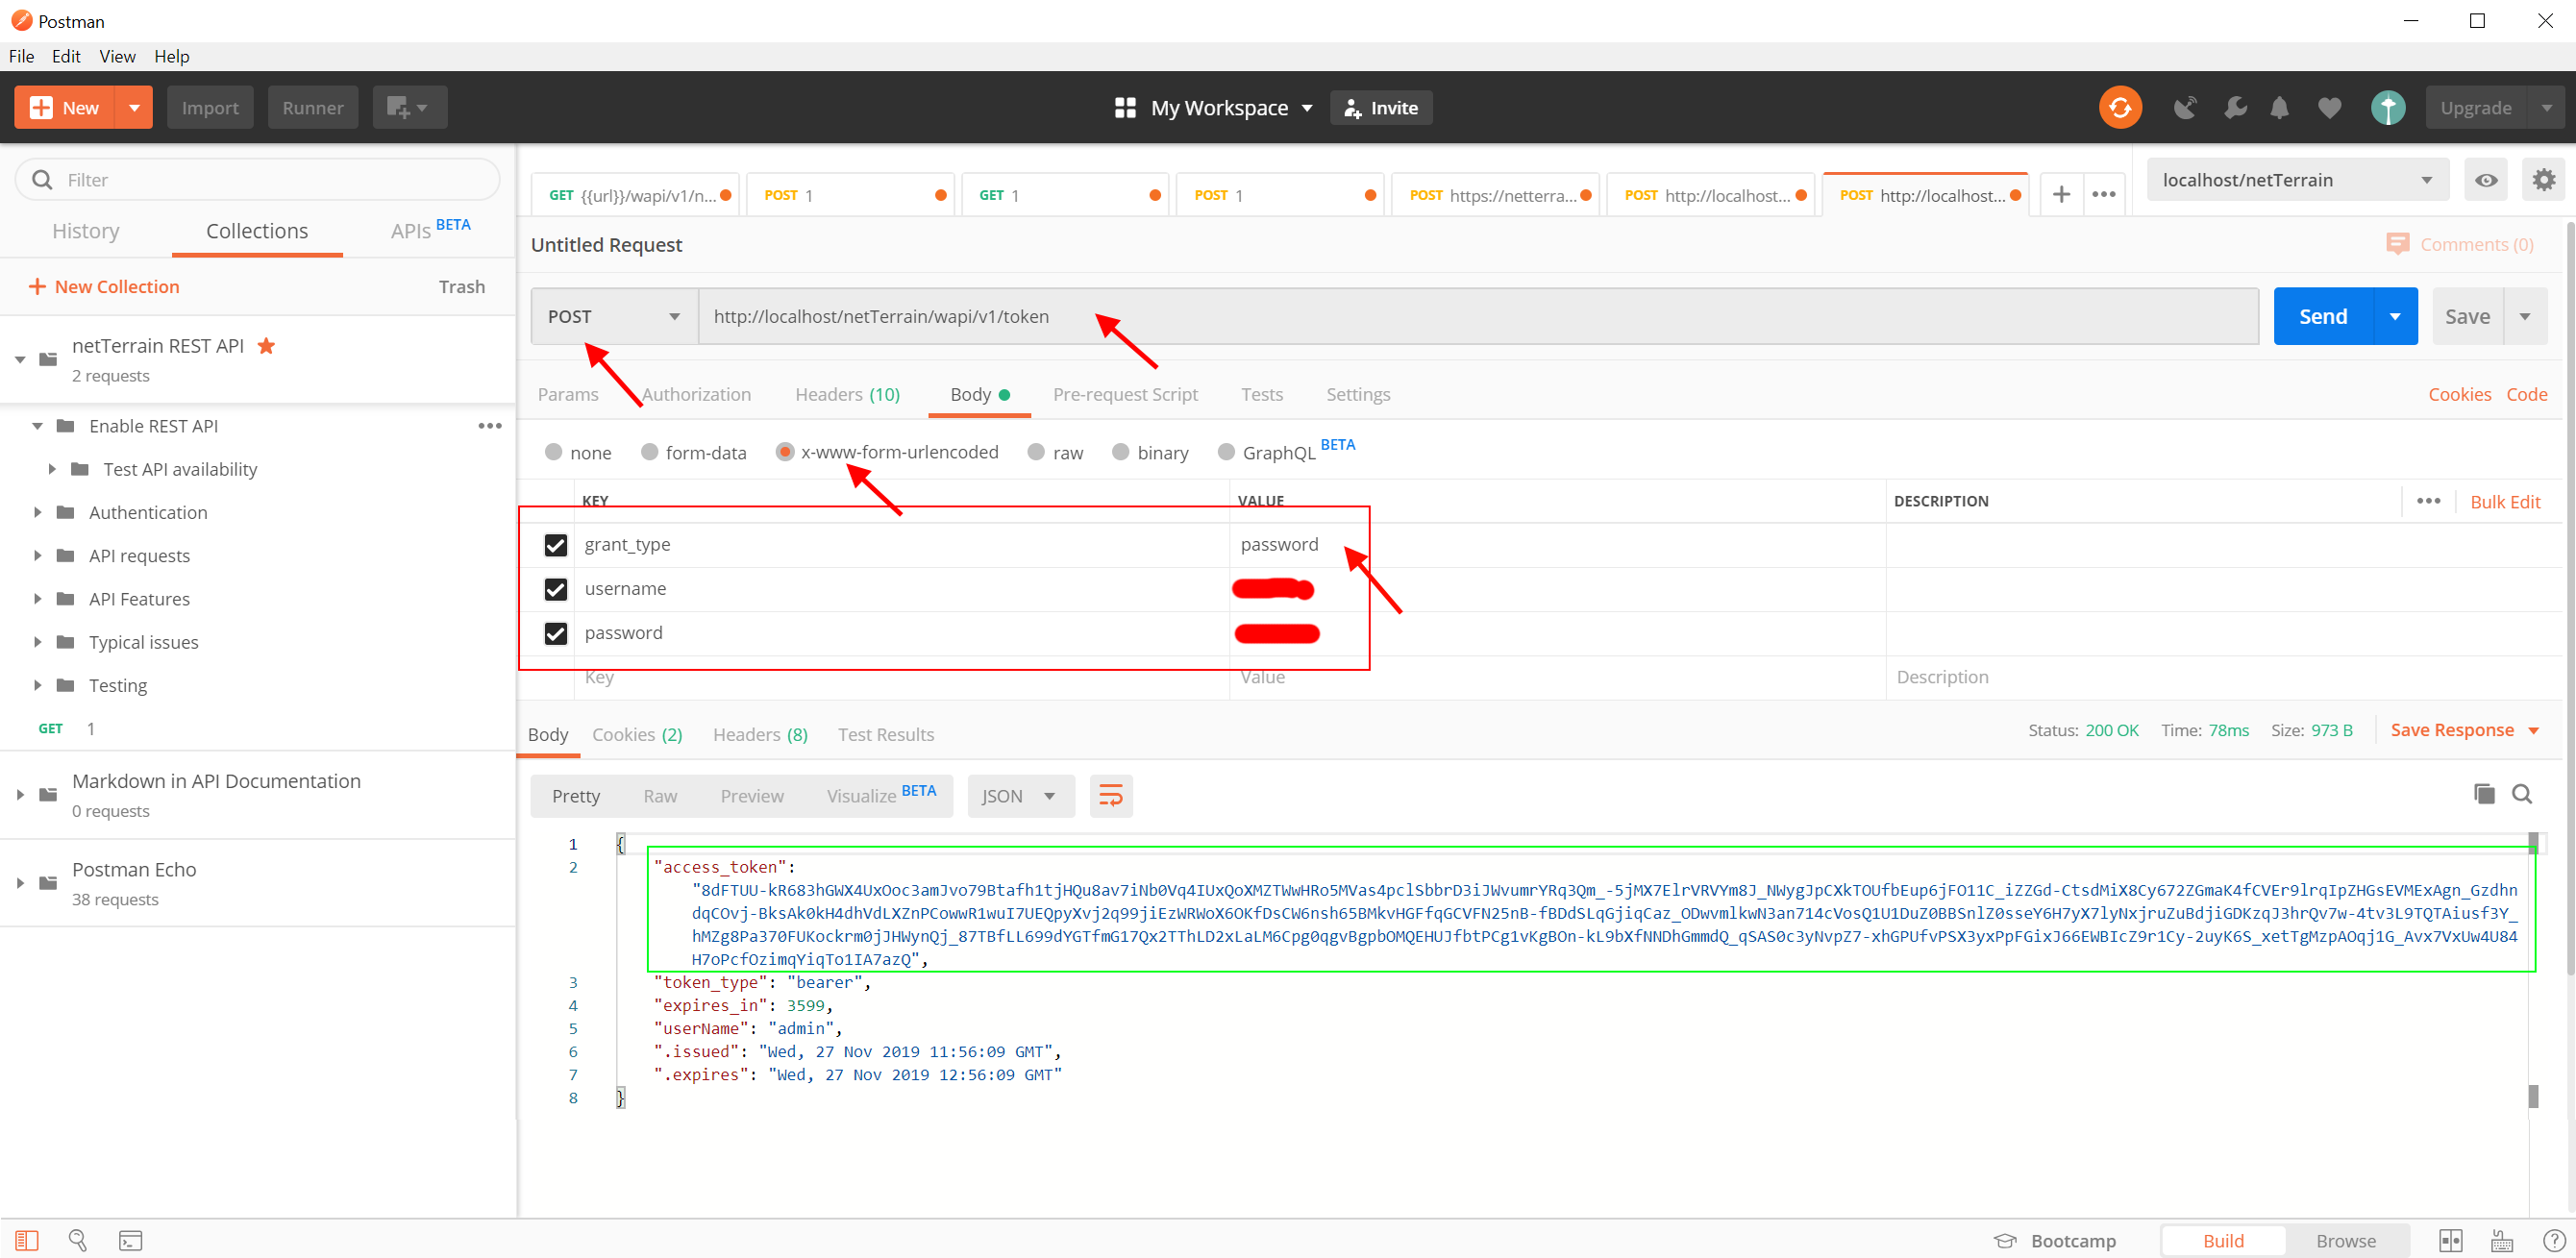
ii. Check out the result – in case of success it should contain an “access_token” which is the bearer token we need.
iii. Copy the token.
e) To add a bearer token to a request:
i. Return to the request from the previous example (POST http://localhost:50001/wapi/v1/vendors).
ii. Go to the Authorization tab, choose the “Bearer Token” in the TYPE combo-box and paste the token to the Token field:
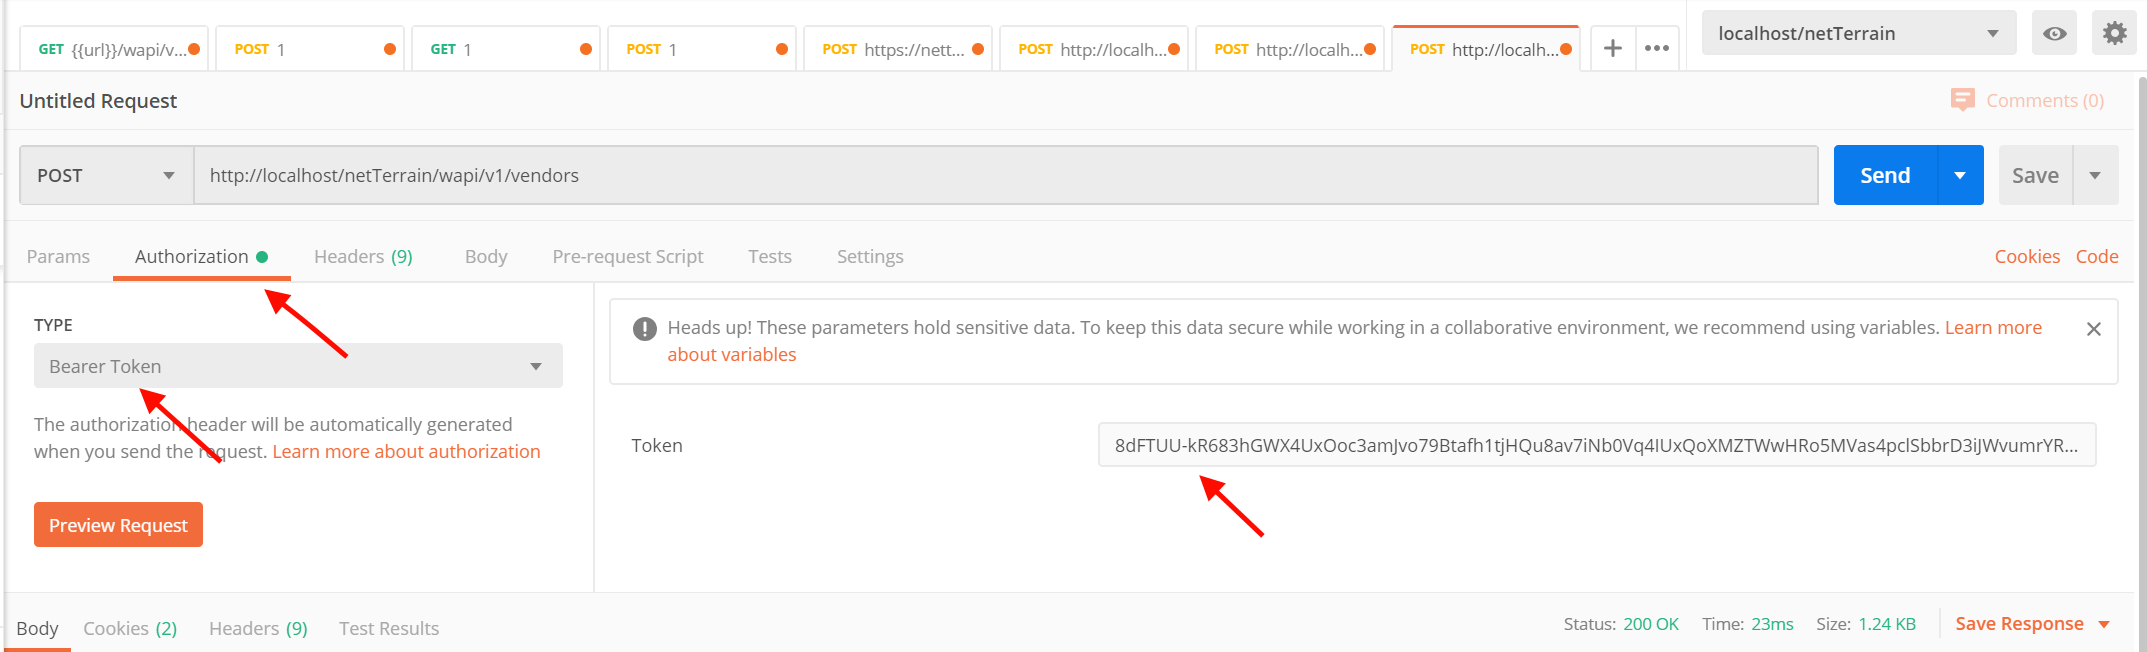
iii. Send the request again.
iv. Check the result. The response should be “201 – Created”.
This concludes the first article in our three-part series on getting started with netTerrain’s REST API.
Want to read other articles in this series?
- Part One: Basic Procedures for Getting Started
- Part Two: Data Retrieval, Writing into netTerrain & Deletion
- Part Three: Manage Collections, Filters, Expansions
Happy Documenting!