
Welcome back to the final post in our series on getting started with netTerrain’s REST API. In the first blog post we reviewed some of the basic setup procedures to get started with the netTerrain REST API. In the second blog post, we delved a bit deeper into data retrieval, writing into netTerrain and deleting some stuff.
Here we will dig even further and look into how you manage collections, filters and expansions. At Graphical Networks we provide full guides to our API as well as classes and trainings if you want to become an expert and feel like you could use a guiding hand.
As a quick refresher: this blog post /exercise guide series is divided into three mini blogs — this series can be useful for all those software developers out there that can’t wait to create integrations with netTerrain but need that extra gear to get things in motion. It’s also dedicated to those netTerrain power users that want to add their special foo and are too anxious to wait for that pet feature in the roadmap.
1.1 Working with collections
Collections are API resources too – as well as single objects. A resource and an object are not really the same – resources are representations of netTerrain objects and sometimes an object may have different representations. But for the sake of simplicity single objects are usually referred to as “resources” and collections are just “collections”.
A collection has its own elements, which are the same for all types of objects it can contain.
a) Run GET to receive a node collection.
http://localhost:50001/wapi/v1/nodes
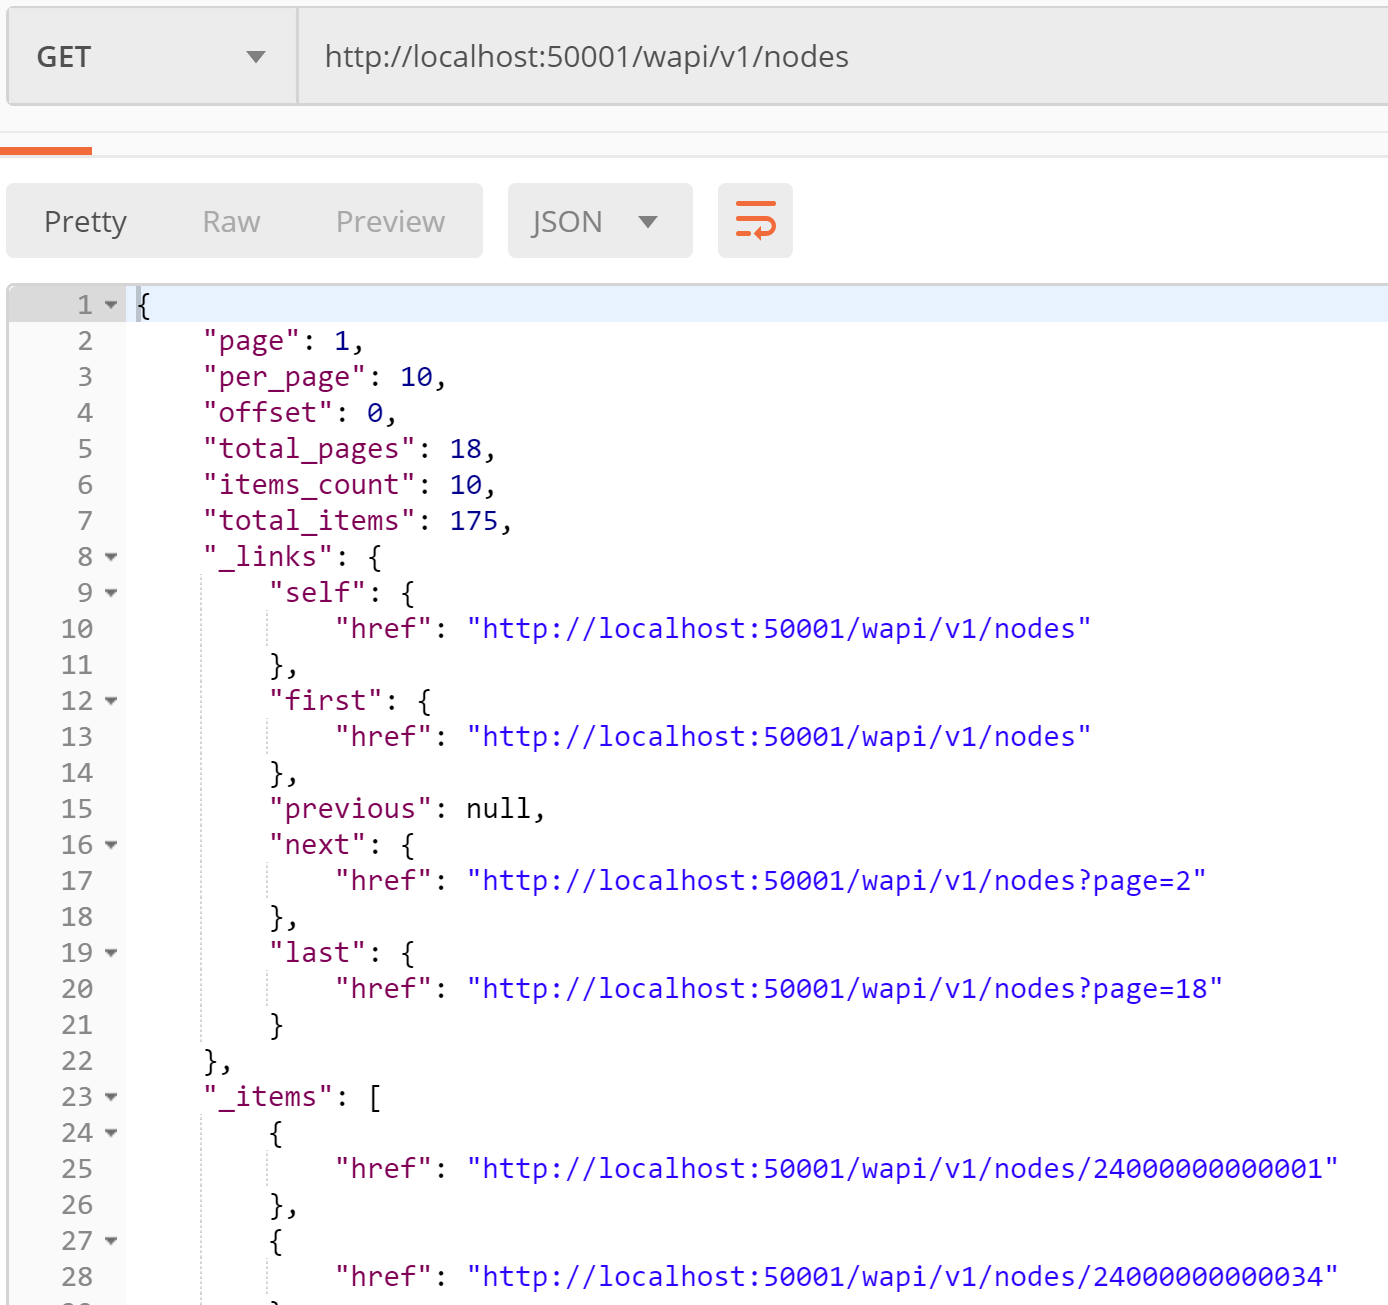
b) “page”, “per_page” and “offset” attributes show what part of the collection is shown (we’ll try to change them in the next exercise).
c) There are also informational attributes: “total_pages” shows how many pages exist in the collection, “items_count” shows how many items are on the current page, “total_items” shows how many items the collection contains.
d) The “_links” section helps iterate through the collection providing links to previous, next, first and last pages if they exist. Also, there is a “self” link to itself.
e) The “_items” section is the meat and potatoes of this method. It contains the resources (nodes in this case). By default, there are just Hrefs here, but the contents of nodes can be expanded as well.
f) At the very bottom there is an “href” link of the collection in its current state– a collection is a resource too.
1.2 Iterating through a collection
Getting just the first 10 elements out of, say 175, is obviously not enough. We would like to know how to get more, or all of them.
To manage a collection, its result page settings can be modified to our convenience:
a) Add the following request parameters to the collection URL:
GET http://localhost:50001/wapi/v1/nodes?page=3&per_page=15&offset=2
b) Send the request and check out the data you’ve received.
c) Notice how all informational attributes of the collection now look different and you can use them to iterate through pages.
1.3 Expanding a collection
It is boring to see just Hrefs in a collection, no? It probably makes more sense to see the content of resources right away, rather than getting them one by one. Let’s get the collection with all the nodes in it, nicely expanded.
You can use an “expand” URL parameter in the API for the purpose of resource expansion. Here we will use it to expand the collection, but it can also be used for resources (more on that later).
a) Add the “expand=self” parameter to your collection URL:
GET http://localhost:50001/wapi/v1/nodes?expand=self
b) Run the request and inspect the output, which should be quite large and include node data.
c) You can use expansions together with page settings. Like this:
GET http://localhost:50001/wapi/v1/nodes?page=3&per_page=15&offset=2&expand=self
1.4 Resources expansion
Every resource or collection can be expanded if they’re a part of another resource. This is so because by default resources returned as a part of another parent resource are represented by its Href. Previously we’ve seen how to expand resources received within a collection. But often resources contain sub-resources (references to another resource) or even sub-collections which can be expanded more than one level in depth.
We’ve already seen how a node looks. Rather boring initially, and lacking in info, so for this exercise we’ll work on some expansions.
In order to get all node sub-resources expanded we have a special “all_children” value for the “expand” URL parameter:
a) Run the following request:
GET http://localhost:50001/wapi/v1/nodes/24000000000042?expand=all_children
b) Check out how big the response is now. It expands both resources and collections contained in this node. For example, there is a “node_property_values” collection that is quite important, since it contains the values for each node property.
OK, in this last example we have returned too much data, which in many cases can be daunting to parse or not very convenient. In most use cases of our little expansion trick, only specific data is required for a given element or collection. Let’s see how we can expand the property values for a given node.
Solution:
a) Run
GET http://localhost:50001/wapi/v1/nodes/24000000000042?expand=node_property_values
b) Send the request.
c) Check out the property values collection in the response. Each property value is a resource in itself. You can see the values and displayed values in this expansion.
1.5 Collections filtering
API users usually objects, types or property values by name, not by Id. In this section we will filter objects by name.
A common API use case is searching for an object by name. Let’s try searching a node called “Ivan’s Laptop” in the nodes collection.
a) Send the following request:
GET http://localhost:50001/wapi/v1/nodes?name=Ivan's Laptop
b) The request above will filter the nodes collection by name attribute. The result would be a collection of nodes called “Ivan’s Laptop”. Note that there could be more than one node in the result collection with that name, since names are not necessarily unique.
It is possible to filter not by a string value but by a child resource’s Href. You can also utilize more than one filter in the same request, like applying a filter with multiple attributes by getting a node called “Ivan’s device” of type “Laptop”.
This concludes the third, and final, article in our three-part series on getting started with netTerrain’s REST API.
Want to read other articles in this series?
- Part One: Basic Procedures for Getting Started
- Part Two: Data Retrieval, Writing into netTerrain & Deletion
- Part Three: Manage Collections, Filters, Expansions
Happy Documenting!