Welcome back to the second blog in our change management series (a series designed to give you a basic understanding of how to use netTerrain for change management). In the previous blog in this series in our IT documentation software netTerrain, we discussed documentation management and, if you read that blog, you should now have a basic overview of how to use those features.
In this blog, we’ll go over the basics of work orders and tasks. While this is, by no means, a comprehensive list of all the features related to this, it’s a good start!
Network configuration changes, data center installs, or outside plant resource commissioning are all activities that typically need some level of change control in your data center infrastructure management (DCIM) tool. Many organizations have dedicated software for the management of work orders and tasks associated with these activities.
netTerrain DCIM can integrate with third-party work order management (WOM) systems via the Integration Toolkit, APIs or some other method. However, organizations that either have no existing WOM system and need to start tracking work orders and tasks or have one but want to replace it, netTerrain also includes a module for that very purpose.
The advantage of the netTerrain WOM module over a standalone or separate WOM tool is that, since it’s part of the core netTerrain software, it automatically reflects changes in tasks in the objects and diagrams visually represented in the system. In other words: no integration is needed!
The WOM module consists of two types of items: work orders and tasks, where a work order can have a collection of several tasks.
Both work orders and tasks can be assigned to netTerrain users who get notified when a new item has been assigned to them.
Introduction to tasks
Tasks in the WOM module are essentially tags assigned to a netTerrain object. We will see that these are no ordinary tags, since there are several things you can do with tasks.
The objects in netTerrain that can have tasks assigned to them include:
Any node
Any link
Racks
Devices
Cards
Slots
Line nodes
Creating tasks
As mentioned before, tasks are associated with objects, so to create the task, you must first have an object to associate it, too. At first, this may seem odd, especially if you have worked with other systems that use a different logic. You may wonder about two things:
What if the task I want to create is related to an object that does not exist?
This seems like a problem with netTerrain’s approach but it is one of its strengths: by first creating the object and then assigning the add task you are essentially creating a “planned” object. Later we will see how this can also be visualized properly.
What if the task is not related to any network object, why do I still have to create one?
Remember that the netTerrain catalog is extremely flexible, you could have a special object type in the catalog just devoted to general purpose tasks (or anything you imagine) and not have to rely on actual, physical objects to create your tasks, so this is not a problem.
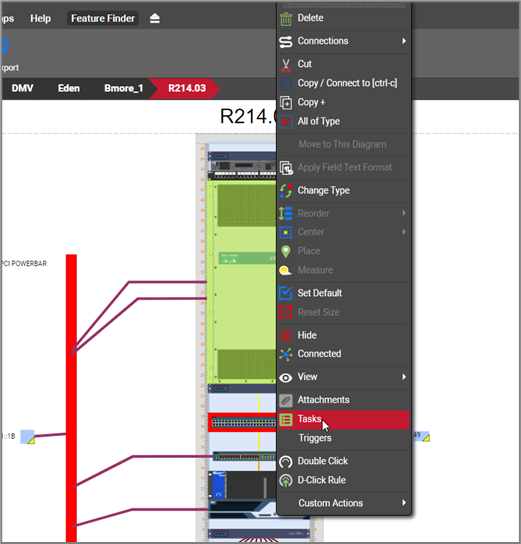
Once you have an object to assign the task to, simply right-click on it and select ‘Tasks’ (or alternatively click on the ‘Task’ button in the Insert menu).
Task work order
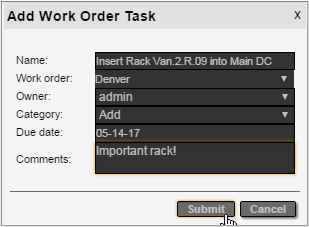
A task must have a parent work order. The second field in the ‘Add Work Order Task’ dialog lets you select an existing work order from the list of all existing work orders, or you can just type a new work order in the text box.
When you type a new work order in the text box it is created in the system, as soon as the task itself is created.
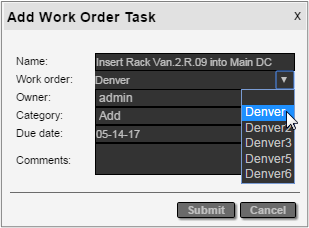 Choosing a parent work order for the task
Task owner
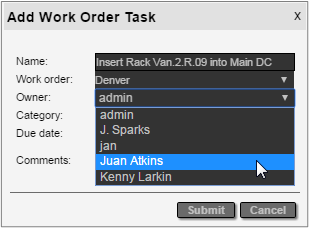
Next, you must choose an owner or stakeholder for the task. The owner is always a netTerrain user with editor rights or better. Updaters (or lower) cannot manage tasks, thus, they cannot be assigned any!
When the task is created, the user will get a notification in the notification area that a task has been assigned to them.
 Choosing a due date for the task
Task category
Tasks come in three categories:
Add (or New) task: here you are essentially creating a “planned” object, which means that the object will be in production only after the task is closed.
Delete task: this is the reverse of the add task, meaning that once the delete task is closed, then the associated object will be deleted as well.
‘Other’ task: this is a general-purpose bucket for tasks that are not adds or deletes.
When you create the first task for an object, if the object is a rack, device, node, link or card, then the default category is ‘Add’. You can pick any of the three categories, except for the object type slot, where the only available category is ‘Other’.
Task due date
Next, you must pick a due date for the task. Note that later, after the task has been added — as soon as the task is due — the stakeholder will get a notification.
Also note that the date field is a calendar control that lets you choose a date in the past. This is ok, since sometimes tasks and work orders need to be recorded in the system, even if they have been completed already (or maybe everybody was lazy, and the task simply might be due for real!).
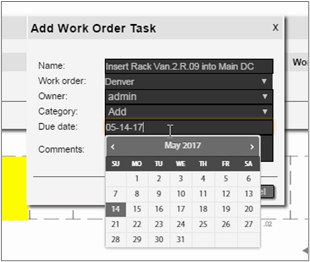 Choosing a due date for the task
Completing the task
The final field lets you add some comments for your work order task. Once you click ‘Submit’ the following actions are triggered:
The task is added to a task list associated with its parent work order
The stakeholder will get a notification for a new task added
If the due date is already in the past, the stakeholder will get a notification as well
Upon submitting, the task list will now show our first task
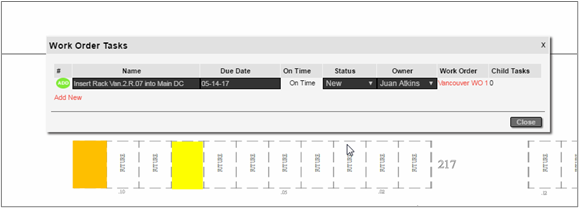 Work order task list for an object
You can add an unlimited number of tasks to an object.
Alright, this is a good place to stop as we now know the basics of work orders and tasks. In the final blog of this three part series we will go over some more details regarding work orders and tasks.

