
Some time ago, my colleague Fred wrote a blog that offered an introduction to change management for our IT documentation software netTerrain. The main areas identified back then were: work orders, space reservation, the Collector status, and audit trails.
The purpose of this blog series is to expand on some of these and to also add document management and attachments as a feature in netTerrain that many users utilize for change management purposes.
In this first blog in the series, we’ll go over document management.
In the next two blogs, we’ll review the work order and tasks features. Space reservation is also certainly part of what a company’s change management process can be, but space reservation is usually done in the context of work orders and tasks.
Basics of attachments in netTerrain
netTerrain can be used to store documents and files, embedded with any node in the project (the project being your network mapping diagrams, your outside plant documentation or your DCIM hierarchy).
Users can take advantage of this feature for the storage of user guides, processes, configuration files, diagrams designed with other tools, and much more. This comes in quite handy in network documentation projects for instance, to store configuration versioning information or in a DCIM or OSP project to store procedures, manuals, images and much more.
The management of stored documents is akin to a SharePoint-Style document repository, and it includes features such as: check-in, check-out, versioning, downloads, locking and history of files. The ability to use netTerrain for document storage means that users can control the change and flow of documentation within the organization.
Uploading a document
You can associate a document to a node (a device, a rack, or any object in netTerrain you can double click on) by uploading the document from a local or network drive to the netTerrain server. When documents are uploaded to netTerrain, they reside in a netTerrain folder called ‘EmbeddedDocs’, which is on the application server.
To upload a document, you must first pick a node that will have these associated documents. You can associate as many documents as you want, and you can use as many nodes to embed documents as you want.
Start by right-clicking on the node and choosing the ‘Attachments’ menu, as depicted in the screenshot below. You can also click on the ‘Attachments’ button in the Insert menu.
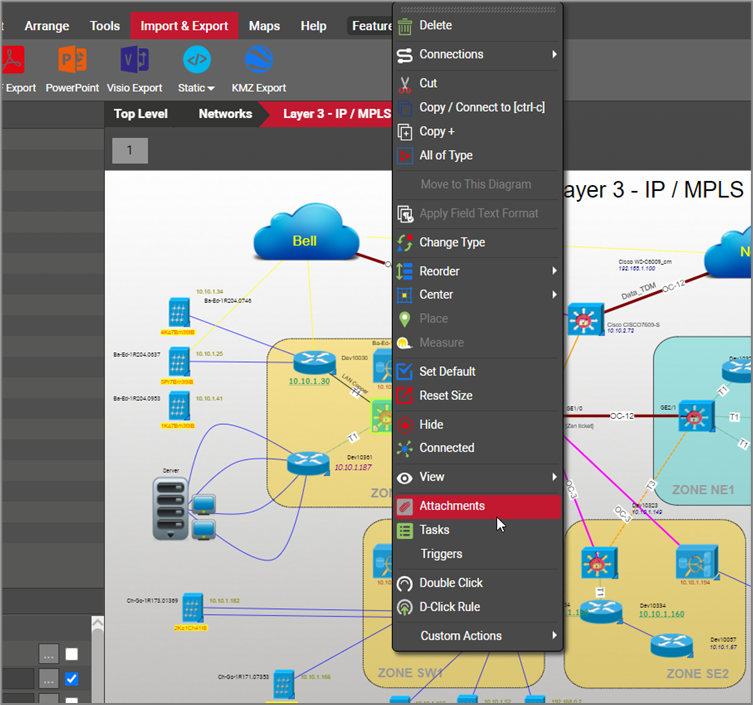 Accessing the document embedding feature for a node using attachments
After you click on the ‘Attachments’ menu, a dialog box called ‘Embedded documents’ is displayed. A node without any embedded document initially looks like the dialog below. By clicking on the ‘Add new’ button, a dialog to upload a document is displayed.
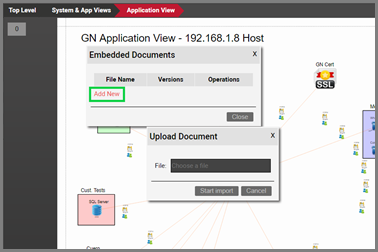 Document upload dialog
Click on the text box to browse for a document. If the document extension is valid (more on that later), then it can be uploaded by clicking on the ‘Start Upload’ button.
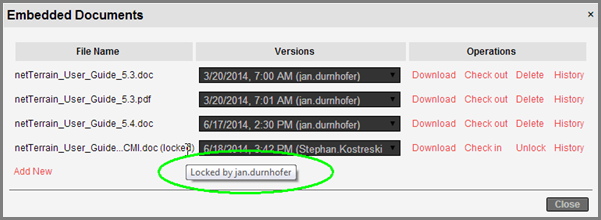
The uploaded document is then stored on the netTerrain server and displayed in the ‘Embedded documents’ dialog. As I mentioned above, multiple documents can be embedded with a node, in which case the dialog looks as depicted below:
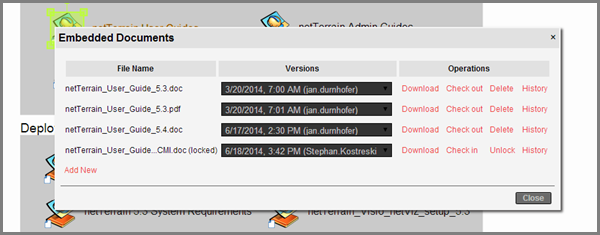 Embedded documents dialog
Embedded documents will be assigned a version and author in which the version is the date and time of the creation (or check in) and the author is the user who originally uploaded it to the server.
Document extensions
Theoretically, any type of file can be uploaded to netTerrain, but administrators can control which extensions are accepted by listing them in the web.config file (see the netTerrain Installation guide).
If the extension of the selected document does not match any extension set up in the web.config file, then you’ll get the following error:
 Unsupported file type error
Downloading, checking out and checking in documents
Let’s say we have a node with embedded documents, and a user wants to get a copy of a document. We have two options to do that: we can download it or check it out.
When we download a document from the server, we can store a copy of it on our local machine and work with it we please, but that’s pretty much all we can do with it. netTerrain will not allow a user to check a document back to the server when it was downloaded. What this means is that any changes the user makes to the document cannot be sent back to the server.
To store any new changes made to a document back to the server, you need to do a ‘check out’ process. By checking out a document, you are, in essence, ‘locking it’ in netTerrain. After the document has been checked out, netTerrain remembers the user that has the document locked and prevents any other user from checking it out. This user can then modify the document locally and check it back in.
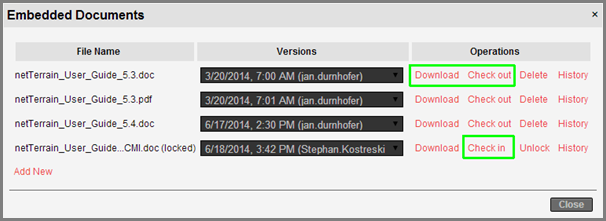 Download, check out and check in options
Naturally, many users can download a document and make changes locally, but only one user can check out a document at any given time. That way, we have in effect established a mechanism for document change control and prevent conflicting changes from occurring on the server.
To know who locked a document, simply hover your mouse over the ‘Locked document’ label, as depicted below.
 Locked document showing the user that is currently working with the checked-out document
As an administrator you can unlock an attachment (see user guide, chapter 10). Once the modified document is ready to be checked back in, make sure it still has the same name as when it was checked out originally, otherwise an error occurs when you’re attempting to check it in.
As soon as the document is checked back in, a new version is assigned to the checked in document, which is, as expected, determined by the date and time of the check in process.
All versions of the document are stored on the server and displayed in the corresponding drop-down box.
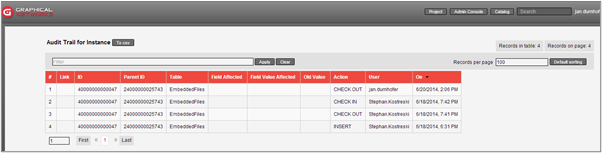
Document history
The entire sequence of events associated with a document is kept in an audit trail, which can be accessed by clicking on the ‘History’ button. This history is displayed in table views, like the audit trails available for nodes and links. In fact, the list view uses the same format as the audit trail list views.
See below:
 Document history
In the next blog in this series we’ll go over work orders and tasks, which is another big aspect of change management in netTerrain.
Until next time, happy documenting!